Wednesday, December 23, 2015

Samsung LN-T4069 and LN-T4071 40 inch LCD repair.

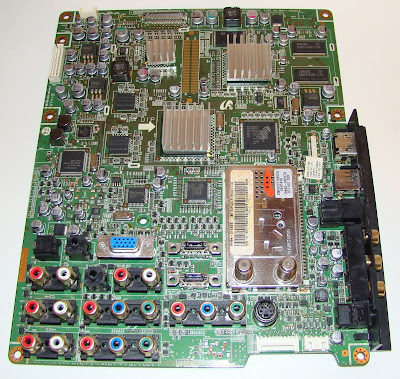
Someone gave me a 40 inch TV that they found in the garbage.  It actually worked at first but after about 15 minutes the picture started jumping.  The first thing I did was to replace all the capacitors in the power supply.  They are located in the upper right corner of the next picture.  I used 1000 uF at 16 volt caps.  Be careful the polarity of one cap is the opposite of all of the others.  That did not help.


I discovered that if I plug in a computer the picture jumps non stop.  So I replaced the input board as shown below.  This fixed the problem but introduced another problem.  The new board had the V-Chip programmed to block some shows.  Now I have to get a remote control so I can wipe out the memory and hence delete the V-Chip programming.
I suspect the problem is in the power supply section located in the upper left corner.  The regulators have been so hot that the metal is purple in color.  I think I will start by replacing the 100 uF at 25 volt caps.

Replacing the capacitors was a complete flop.  I tried carefully wiggling the caps from side to side to remove them but in every case I removed the runs from the board.  I guess I am staying with the new board as it mostly works.  I was able to wipe out the V Chip programming with the remote control.
Ramsa WR-S208 Mixer Power Supply Repair

Over the weekend I finally got around to repairing this Ramsa Mixer.  The symptoms included that the solo light was on in one place and not on at another and that the overload LED's were lit with no input.  I opened it up to look inside and then everything started working correctly.


I started wiggling things and when I touched the power supply the mixer stopped working.  So I removed it and examined it for bad connections.  Sure enough one of the voltage regulators was no longer soldered in.

Here is a closer look at the problem.

Wednesday, December 16, 2015

Designing a DIY "Head" for your 15/17 DOF Servo Robot

There are many robot kits on eBay.  They all lack a "head".  So to get ahead you need to make your own.  I used a "Make your own Christmas tree Ornament".  They sell these 2.5 inch diameter clear plastic balls that you can use to make Christmas tree ornaments.  They can also make a head for your robot. Here is a picture of a robot without a head, just a servo motor.

He looks better with the clear ball over the servo.


You can also paint it and add a circuit board with some LED's for eyes and a mouth like in this picture.

Here is another DIY robot head this time it is made out of a 3.2 inch Christmas tree bulb.


Friday, December 4, 2015

Arduino Powered Hexapod/Spider 18 DOF Robot Part 2

Its time for an update on the spider robot.  So far I have repaired the sensor shield twice, replaced the power cable and now replaced two of the servos.  I have changed two of the MG996's to the more powerful MG958's.  That made a huge difference!  The spider can now get up completely off the floor!  The new servos also made the spider a lot quieter as the other servos do not have to work as hard.

Here is a picture of the spider folded in.

 Here is a picture of him walking.

Here is video one before replacing the two servos with MG958's.


This is the next video with the better servos.


And now the latest video with better software.