I thought I would make another sign, this time it will be used in selling my books at various events that I attend. I wrote my own CNC program to cut out the letters and the space allotted for the "I" was too wide. Also while the CNC was cutting the plastic, the holder for the bottom of the Dremel fell out of the machine. This allowed for play in the Y axis as can be seen in the top of the letter "I".
The wood base was cut with the CNC in "manual" mode. Basically there are 8 holes spaced one inch apart. The LED's are wired up in groups of two going one direction then two going in the other direction. This reduces the wiring to a minimum. A 220 ohm resistor goes to a 9 volt battery for power.
Here is the video of the CNC machine running.
I have used F-engrave with a few changes to the settings to engrave "Arduino Books" into another piece of Plexiglas.
This is what the sign looked like when done with the room lights turned off.
My wife has wanted me to hide the wires going to the TV for some time now. This is what I started with, a TV with lots of wires going to it.
This is my secret weapon, electrical pass through boxes. These and a hand held hole saw did the trick.
I ran into problems right from the start, electrical wires that were in the way. They had to be moved to the right slightly. They also made cutting the hole a bit tricky.
Then there was a second problem, there is a 2x4 going cross wise in the wall. I cut it off on the right side and then cut off the nails.
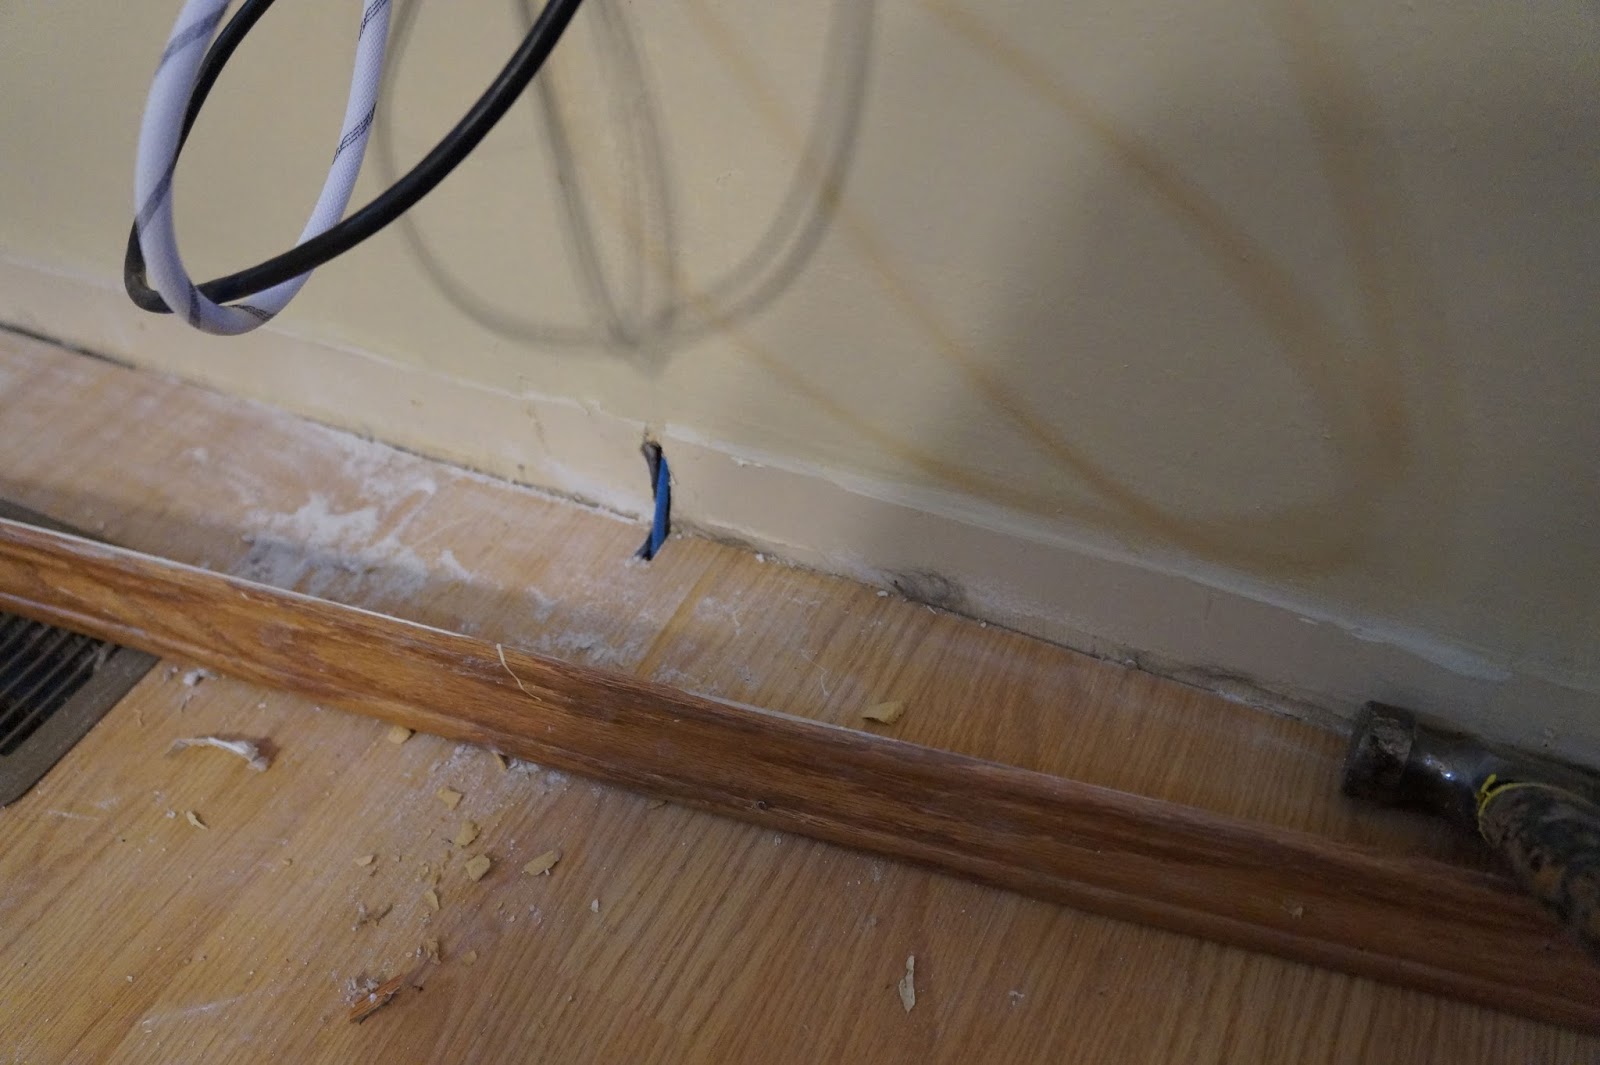
Last was to hide the cable and internet cables behind the baseboard. I cut a grove in the sheet rock and a grove in the baseboard.
Time to patch up the hole where I had cut through the cross wise 2x4. A piece of thin plywood like luan works for the backing.
This is the almost finished product. Now to repaint the wall....
After some experimenting I have come up with an alternate power supply for the Dell 2300MP Projectors. At first I bought some that did not work then I found out that with a slight modification this CT-300 power supply works.
This is my collection of dead Dell power supplies.
This is a size comparison. The new power supply is a little bigger but the projector has plenty of room for the power supply. Note that the cable to the motherboard is backwards and that there are 2 extra pins towards the 110 volt connector end of the power supply.
The new power supply will not turn the projectors bulb on. It needs a modification to supply 5 volts to the extra pin that is not ground via a 1 K resistor as seen in this picture.
I recently received a shipment of LED Projectors, they are 2000 lumen Pyle PRJD907's. They were all sold "as-is" broken but they were easy to fix. One had a bad soldering connection in the power supply. They all had loose power supplies, the mounting needs to be improved. I glued the power supplies to the light cover at the end closest to the heat sink.
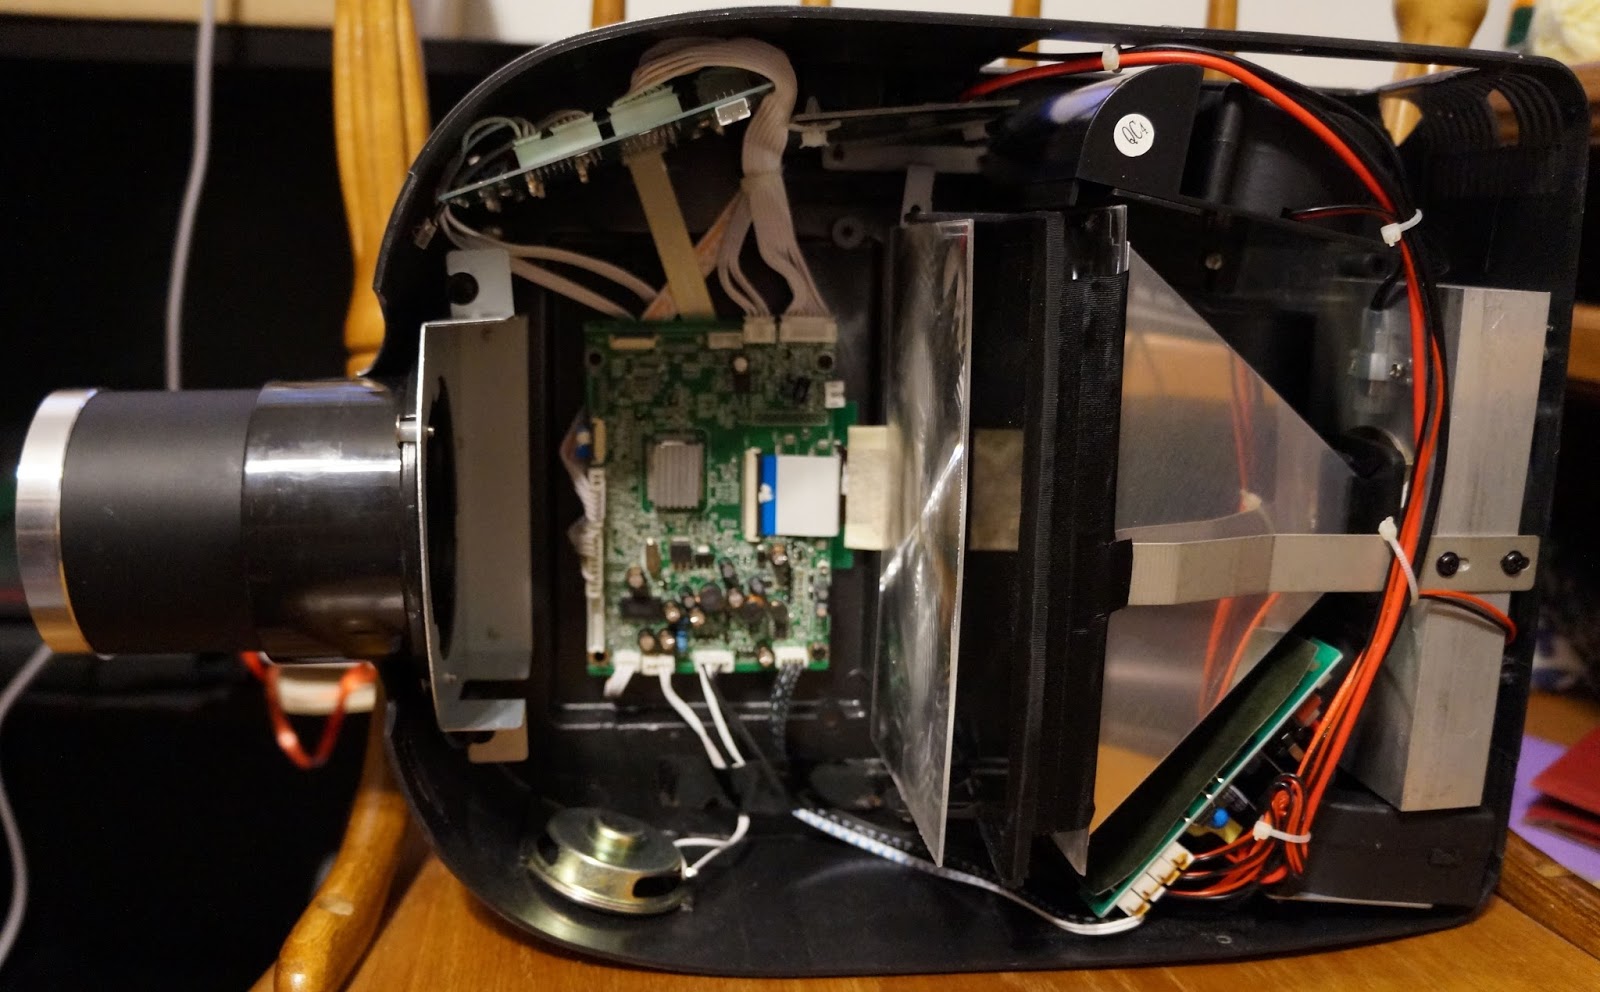
This picture shows what is inside the projector. At the back is the LED heat sink with cooling fan. In the middle is the LCD screen. At the front is the projection lens.
This is what the projector guts looks like when it is running.
Here is the video on YouTube. I hope to compare several 2000 lumen projectors at a time in the near future. I have also ordered a light meter so I can find out what the actual lumens is for each projector.
I have managed to find a place where I can compare multiple projectors. Here are a couple of videos showing 3 projectors at a time.
Here is a quick summary of my findings;
Epson EMP-S1 Rated: 1200 lumens Tested: 460 Lux
Pyle PRJD907 Rated: 2000 lumens Tested: 230 Lux
No Name CL312 Rated 2000 lumens Tested: 100 Lux (Note: damaged LCD)
Pyle PRJG65 Rated: 150 lumens Tested: 30 Lux
Erisan Rated: 1200 Lumens Tested: 40 Lux
Crenova XPE460 Rated: 1200 Lumens Tested: 60 Lux
The Crenova XPE460 is the best under $100 projector in my opinion. They have replaced it with a newer model the XPE480.
Over the weekend my first 2000 lumen LED projector arrived. It needed minor repairs, it had been dropped and the power supply and one lens were loose. This projector can be used with the lights on but it is no way near as bright as the 2300 lumen Dell 2300MP projector.
Here it is with the room lights on.
Here it is with the lights off and the Crenova 1000 lumen projector is on the left side for comparison.
This is what the insides look like, notice the big fan cooled heat sink on the LED light source in the back.
Here is a picture of the CL312 projector running with the cover off. The LED is blindingly bright!
Last night I tried to cut a company logo into plastic. I had to code the logo first the fire up the Dremel. Cutting plastic is not like cutting wood. The plastic built up on the bit and caused some uneven edges. This is what the finished produce looked like.
This is what it looked like with themarker after two successful passes.
Here is the video on YouTube.
Here is an improved version of cutting plastic. The cutting is improved by using a bit that sends the chips flying so they do not get glued back in. Professional versions also have a vacuum surrounding the bit to suck up the chips and keep the bit cool.
I now have two of the 1000 lumen LED projectors to compare. In the last post I compared the Crenova to a 1500 lumen Light Bulb type Epson projector. Now it is next to a Erisan LED projector. These projectors are sold under a number of different names and you have to go by the picture not by the "brand" name.
This is the back view of the projectors.
This is the front view.
This is what it looks like on a white wall. The Crenova is on the left.
Here is the video of those two projectors.
Soon I will be comparing 2000 Lumen LED projectors to see how they perform.
Those who follow my blog might know that I like to refurbish used projectors and send them overseas with missionaries. Recently someone told me that he can get brand new 1200 lumen projectors for only $79. I asked him if he still wanted the refurbished projectors and he said "Yes, they are much brighter!" Really? So I purchased a dead XPE460 and fixed it. There was a bad connection at the power plug. The loose power wire can be seen in the lower right corner of this picture.
Next I set it up next to a 1600 lumen Epson EMP-S3 for comparison. The picture was taken with the projectors about 7 feet from the wall. The EMP-S3 projector is on the left. If this is 1600 lumens versus 1200 lumens I will eat my hat! Looks to me like it is 1600 lumens versus maybe 400 lumens.
In a totally dark room the Crenova XPE460 works fine, well almost. The cheap lens makes if difficult to focus the center of the picture and the outside edges at the same time. This is the screen in a dark room. (I turned off the other projector).
However as far a small size the Crenova LCD projector (The closer one) is much smaller that the Dell 2300MP DLP Projector (Back Left) or the Epson EMP-S3 LCD (back right).
Long term I can foresee that eventually LED powered LCD projectors will take over the market. They are cheaper and more reliable than the projectors that use light bulbs.
Sept 24 was the Hamfest (Radio Amature Flee Market) in Elmira/orseheads NY. This was my first time to go to this event. It was quite large and well attended. I did not buy much. My favorite purchase was 2 overflowing quarts of grapes. They were delisious! Other than that I bought a L/C/R meter for $15 and some VGA cables.
This was a really old projector, at least that is what the label said...
This is a picture of the event from the ground label.
This I think is a really old tube tester.
How about a 1000 watt RF amplifier?
This is my collection of stuff to sell. There is a lot of free stuff.
This is a picture of the event from a higher location.
I have been busy rebuilding my DIY CNC machine. It will be all metal when I get done. It will also include a USB interface, likely an Arduino. None of my computers have a parallel port these days. So something has to be done to resolve that issue.
This first picture is the new metal parts all drilled and ready for assembly. Well maybe ready to be filed so they can be assembled.....
Here is the first video, getting the electronics working again:
Here is the second video with the X and Y axis working:
I have finally ben able to get GRBL to work with my CNC.
You will need to install the Arduino software.
Then plug in the Arduino and install the driver.
Then Unzip and install the GRBL software into the Arduino library.
Then compile and upload the GRBL software into the Arduino.
Open the serial interface and set the baud rate at 115k
Then install Universal G-Code Sender on the a PC
Set the baud rate to 115K and you should now be able to control the CNC.
Now to get the limit switches to work.....
My latest upgrade is to mount the Arduino to the electrical area. The limit switches are still not wired up.
The Z axis is now working!
Here is the latest video:
By the way I tried one of the Arduino CNC shield's but the IC's got so hot that you could cook on them and then it started hanging up because it was overheating.
I recently added some more shelves in my lab to hold more books, videos and projects. Here is a couple of views of the room.
On the left side at the top there is my DVD video collection, below that there are my Volt/Ohm meters, cameras, etc. Lower down is my prototypes for my books in white plastic binders. Center is my project shelves with some dinosaurs and my CNC machine covered in stuff. At the bottom there is a cupboard that my dad built for me when I was a teenager.
In this picture is my free-to-me 32 inch TV mounted on the wall. Below that there is my free-to-me 17 inch laptop and a road kill 24 inch monitor (attached to the Raspberry Pi on the desk at this time). To the right of that is my Epson printer that was also given to me. The book shelf on the right side of the picture actually holds books as well as some parts bins and my CD / Software collection. The cute brown dog is something I made way back when I was in high school.
So there you have it, the room where all of my books have been written, the room where my inventions are being built.
I know there are hundreds of other posts on this subject. I have now tried it and it works! The last time I sent the motherboard off and spent some money to fix it. I had two sick HP DV9700 laptop's and I could not even sell them for $40 on eBay. So with nothing to loose I thought I would give it a try myself.
You will need the following.
1. Spacers for under the motherboard to allow air flow underneath it.
2. An aluminum heat shield, a pie plate works
3. A heat gun capable of reaching about 450 degrees.
4. The defective motherboard.
5. A timer, a cell phone will do.
First run a time test. Set a piece of solder on a metal surface and with the heat gun one inch away from it see how long it takes to melt the solder. In my case it took 3 minutes. Set the motherboard on the spacers and center the heat shield over the GPU chip. In the picture above it is the left green chip located just above the center of the arc where the cooling fan goes. Start the timer and hold the heat gun in place moving it slightly to heat the top of the chip evenly. After the timer runs out let the motherboard cool slowly, like for 30 minutes before handling it or reassembling it.
Reassemble everything and hopefully you now have a working laptop! So far this has fixed every motherboard that I have tried it on. This fixes problems like CD ROM drive not recognized, No sound, garbage on screen, etc.
The 2016 Batavia Hamfest was the best Hamfest that I have attended this year. Maybe also one of the biggest in Batavia as well. I only spent a little over $20. For that I purchased two studio quality TV cameras (They were not the new widescreen format, but they work!) and a laptop computer. There was also a 25 foot VGA extension cord for 25 cents!
There was lots of interesting stuff for sale too. This was some sort of antenna tuner.
How is this for a really old tube tester?
Portable radios by the box full....
This is where I bought the two TV cameras.
Oh, and here is my stuff. Mostly free stuff....
Here is some more neat radios.
How about a genuine HH Scott radio?
This vacuum tube amplifier looks great. Reminds me of the first amp I built, but looks lots better.